I accidentally deleted a bunch of important work and personal files from my Windows PC and the Recycle Bin is already emptied. I’ve narrowed recovery options down to Disk Drill and Recuva but I’m not sure which one is more reliable for everyday use, especially for standard documents, photos, and a few videos. Has anyone used both and can share which recovered more data, was easier to use, and safer to install on a main work computer?
Alright, here is my long ranty field report on Disk Drill, rewritten from the ground up like I’m posting on a forum after yet another “which recovery app should I use” thread.
I’m not in IT, I shoot photos and video on the side. Paid gigs, nothing huge, but enough work that I end up juggling SD cards, USB SSDs, a chunky spinning HDD on my desk, and a laptop that travels with me. Stuff goes missing. Cards get yanked mid-write. Windows decides to “repair” a drive I told it not to touch. You know the drill.
Over the last few years I went through a handful of recovery tools. One of them wrote new data to the source drive during “recovery” and nuked a bunch of files that probably were still savable. That one still annoys me when I think about it.
Somewhere in that mess a friend who does IT pointed me to this Reddit thread and told me to stop experimenting and stick with Disk Drill:
So I did. Below is how it went, from someone who has used it on real disasters, not fake test folders with a couple of Word docs.
Fast start, no weird “scan mode” choices
What I noticed first is what Disk Drill does not ask you to do.
With a lot of tools you fire them up and immediately run into:
- quick scan vs deep scan
- file signature mode vs file system mode
- “these options are for advanced users only”
Pick wrong and you either:
- miss half your data
- waste half a day on a scan that finds junk
Disk Drill skips that decision tree. You pick the drive. You press scan. That’s it.
Behind the scenes it runs several methods in parallel. It checks the existing file system, does deeper passes, and hunts for file signatures all at once. I had people who struggle to attach a PDF to an email use it without calling me every ten minutes.
From “oh no” to “ok, there it is” is short. That matters when the data isn’t hobby stuff but paid work.
Scanning speed, with numbers not vibes
I log things. Not in a spreadsheet or anything neat, but I write times down when panic is high.
Here is what I have from my own runs:
- 32 GB SD card (SanDisk Extreme, UHS-I), USB 3 reader to a Windows laptop: around 2 to 4 minutes to complete a full run, first previewable files showing up in under a minute.
- 500 GB external HDD over USB 3: I usually see 15 to 25 minutes, depending on how fragmented and sick the drive is.
- 1 TB SATA SSD on an internal connection: 20 to 35 minutes, but I am browsing results in the first few minutes, long before it ends.
The important part for me is not the raw number. It is that I do not have to wait for the bar to hit 100 percent before I see anything useful.
Disk Drill streams results in as they are found:
- file counts update on the fly
- folders populate while the scan is running
- I can start marking and recovering files before the scan is done
More than once I have grabbed the critical files mid-scan for a client, sent them off, then let the scan finish while I get coffee.
Formats it understands, especially for camera people
Marketing pages like to say “supports hundreds of formats.” Disk Drill throws out a similar claim, but the difference shows when you feed it weird camera outputs.
From my notes and use:
Photo RAW formats it has handled cleanly for me:
- Canon: CR2, CR3
- Nikon: NEF
- Sony: ARW
- Olympus: ORF
- Panasonic: RW2
- Adobe: DNG
- Fuji: RAF
These do not show up as random generic blobs. The previews work. Histogram in Lightroom looks identical to the original when I compare. I have recovered CR3 and ARW sets that were indistinguishable from the surviving files from the same shoot.
For video and other stuff I have personally seen it pull back:
- H.264 and H.265 footage from DSLRs and mirrorless
- GoPro and DJI clips
- ProRes files from a drive a video editor handed me in a panic
- Office files (docx, xlsx, pptx)
- Audio files (wav, flac, mp3)
- Compressed stuff (zip, rar, 7z)
- Some oddballs like Autodesk Maya project files and RED camera R3D clips that a friend tested
I do not use half of those professionally, but when an app is aware of ProRes, R3D, and RAW formats properly, I trust that someone sat down and did real work on the scanner engine.
The wedding shoot that went sideways
This one sold me more than any feature list.
A friend of mine shoots weddings full time. Two 64 GB SD cards in a dual-slot body, RAW plus JPEG, all day wedding.
She got home, plugged the first card into a cheap reader. Mid copy, her Windows machine locked up. When she rebooted, the card appeared as “RAW” in Disk Management. No file system, Windows asking to format it.
She called me close to midnight, in panic mode.
I drove over, brought my laptop, installed Disk Drill, then did this:
- read-only scan of the RAW card
- did not let Windows “fix” or format anything
- waited about 4 to 5 minutes for a full scan of the 64 GB card
Results:
- over 800 RAW images
- about 400 JPEGs
- all of them previewable in Disk Drill
- random spot checks in Lightroom and Photo Mechanic looked perfect
Recovery took maybe another 3 to 4 minutes to copy everything to a separate external SSD.
No partial images, no weird color blocks, no zero byte junk. Everything looked normal enough that the couple never knew there had been a problem.
She bought Disk Drill the next day and dropped off a bottle of wine for me the week after.
Why the preview matters more than they advertise
This is the part I did not appreciate until I started dealing with half-dead drives and cards.
When you scan a damaged drive you usually get:
- clean, fully intact files
- files that look fine by size but are partially overwritten and broken
- pure garbage fragments that resemble files only by extension
Without preview, you end up in this loop:
- select a big chunk of files
- recover them
- open them one by one
- delete the broken ones
- repeat until your eyes hate you
Disk Drill flips this. You:
- click on a file in the results
- it shows you an inline preview if possible (photo thumbnail, playable video, doc text)
- there is a “recovery chance” label next to it, like:
- high
- average
- low
So before copying anything out, you know:
- whether the photo loads and looks normal
- whether the video plays beyond the first few seconds
- whether the text document is not empty or gibberish
This matters when the scan returns tens of thousands of items. I filter by high chance, preview a few random samples across the folders I care about, then select that subset only.
Saves time, and saves external drive space too.
Video recovery from cameras, drones, and action cams
Standard recovery tools struggle with camera video. I learned this the hard way.
Most cameras and action cams write video in chunks, scattered across the card. The file system knows the right order. Once the file system breaks, naive scanners pick up fragments and glue them together without context.
Result:
- clips that start fine then freeze
- playback that jumps or shows corrupted frames
- files that media players refuse to open
Disk Drill has something called Advanced Camera Recovery. Weird name, but the behavior is different enough that I took notice.
It has profiles for gear such as:
- GoPro
- DJI drones
- Canon, Sony, Nikon bodies
- Insta360
- Panasonic
I tested it on a 64 GB card from a DJI drone after the card went corrupt mid-flight. Card turned RAW, no files visible.
Process:
- plugged the card into a reader
- launched Disk Drill, selected the card
- ran the camera-specific recovery on it
Results from that one card:
- around 6 hours of 4K footage
- 12 major clips I cared about
- all 12 recovered and fully playable, start to finish
Later, I ran two other recovery apps on a clone of the same card. Best result from those was 2 clips that played through. The rest were chopped, freezing halfway, or refused to open.
So there is a practical gap there. For drone pilots, vloggers, anyone who leans heavy on GoPro or similar, this makes a difference. For me it turned a total loss into a usable project.
How I handled a dying 2 TB HDD
This one is less glamorous and more “you do not want to learn this lesson the hard way.”
I had an old 2 TB external HDD used as a dumping ground for years of random work footage and raw project folders. One day it started making that soft click every once in a while. Not continuous, but enough to trigger dread.
The typical reaction is to run a full recovery scan directly on it. That is also one of the fastest ways to push the drive over the edge, because every read means more stress.
Disk Drill has a byte-to-byte backup that clones the entire failing drive into an image file.
What I did:
- Plugged the drive in and opened Disk Drill.
- Went to the backup feature, not the recovery scan.
- Created a full disk image on a separate healthy drive.
The good part is how it handles flaky media:
- it first reads all good sectors in big chunks
- bad sectors get skipped on this first pass
- after the quick grab of healthy areas, it returns to the failing sections and retries using smaller reads
- it maps this on a visual grid so you see:
- clean regions
- sectors with slow or noisy reads
- completely unreadable areas
You can pause this process and resume, which is useful if the drive is overheating or making more noise.
Once the image is built, you:
- unplug the dying disk
- put it away and do not power it again
- mount the image file in Disk Drill
- run recovery scans against the image instead
I got somewhere around 1.8 TB out of that 2 TB disk before it went fully dead a few weeks later. If I had hammered the drive with direct recovery scans, I suspect a chunk of that data would have been lost for good.
S.M.A.R.T. data as early warning
Disk Drill also reads the S.M.A.R.T. diagnostics stored inside drives.
Nothing fancy, but enough to see:
- power-on hours
- temperature history
- pending and reallocated sectors
- error counts
I used dedicated tools before, but over time I started opening Disk Drill first because I already had it there.
Twice now I saw:
- slow increase in reallocated sectors
- rising read error counts on a drive that still “felt” fine day to day
Both times I moved data off within a day. Within a month, both disks went south. One stopped showing up reliably. The other began throwing read errors on large file copies.
Recovery is slower and less reliable than plain migration. So getting that heads-up inside the same app I use to recover data has been more helpful than I expected.
Recovery Vault, or pre-planning for fat-finger moments
There is a feature called Recovery Vault. It does not mirror whole files. It stores extra metadata for stuff that gets deleted in monitored locations.
What it remembers per file:
- original name
- original location
- some internal record details that help with reconstruction
I turned it on for:
- my main “Projects” folder
- Desktop
- a couple of client-specific folders
Disk Drill sits in the background and logs deletions in those watched places. It barely shows up in resource monitoring.
Upside when something gets nuked:
- I see the original file name in the results, not “file000123”
- folder structure is intact, so I know context
- recovery success rate is higher because it has stored the right details up front
This is less about big disasters and more about those days when I drag the wrong folder into the trash while half asleep.
Using it across Windows and Mac
My desk setup is Windows. My laptop is a MacBook. I bounce between them depending on where I am.
Disk Drill gives you both versions under a single license. The layout on both is nearly identical, so there is no re-learning.
Two things that have been practical for me:
- I can start a long scan on a Windows box, save the session, then move that session file to my Mac and continue there.
- If someone hands me a Mac-formatted drive while I am at my Windows machine, I can still inspect it without having to dual boot or install extra drivers.
This cross-platform bit is not flashy, but when you juggle machines, it keeps things sane.
File systems it recognizes without special hoops
Stuff I have personally thrown at it:
-
Standard Windows:
- NTFS
- FAT32
- exFAT
-
macOS:
- HFS and HFS+
- APFS
-
Linux:
- EXT2, EXT3, EXT4
- BTRFS
-
Others:
- ReFS
- plain RAW storage with no readable file system
One day I had a coworker shove a USB stick at me saying “it has our Linux server configs and I plugged it into Windows and now it wants to format it.”
Windows was useless here, obviously. Disk Drill saw the stick, showed “EXT4,” let me scan, and pulled all the config files off without asking me to touch Linux directly.
For quick jobs like that, not needing to boot a live Linux environment or install random drivers is convenient.
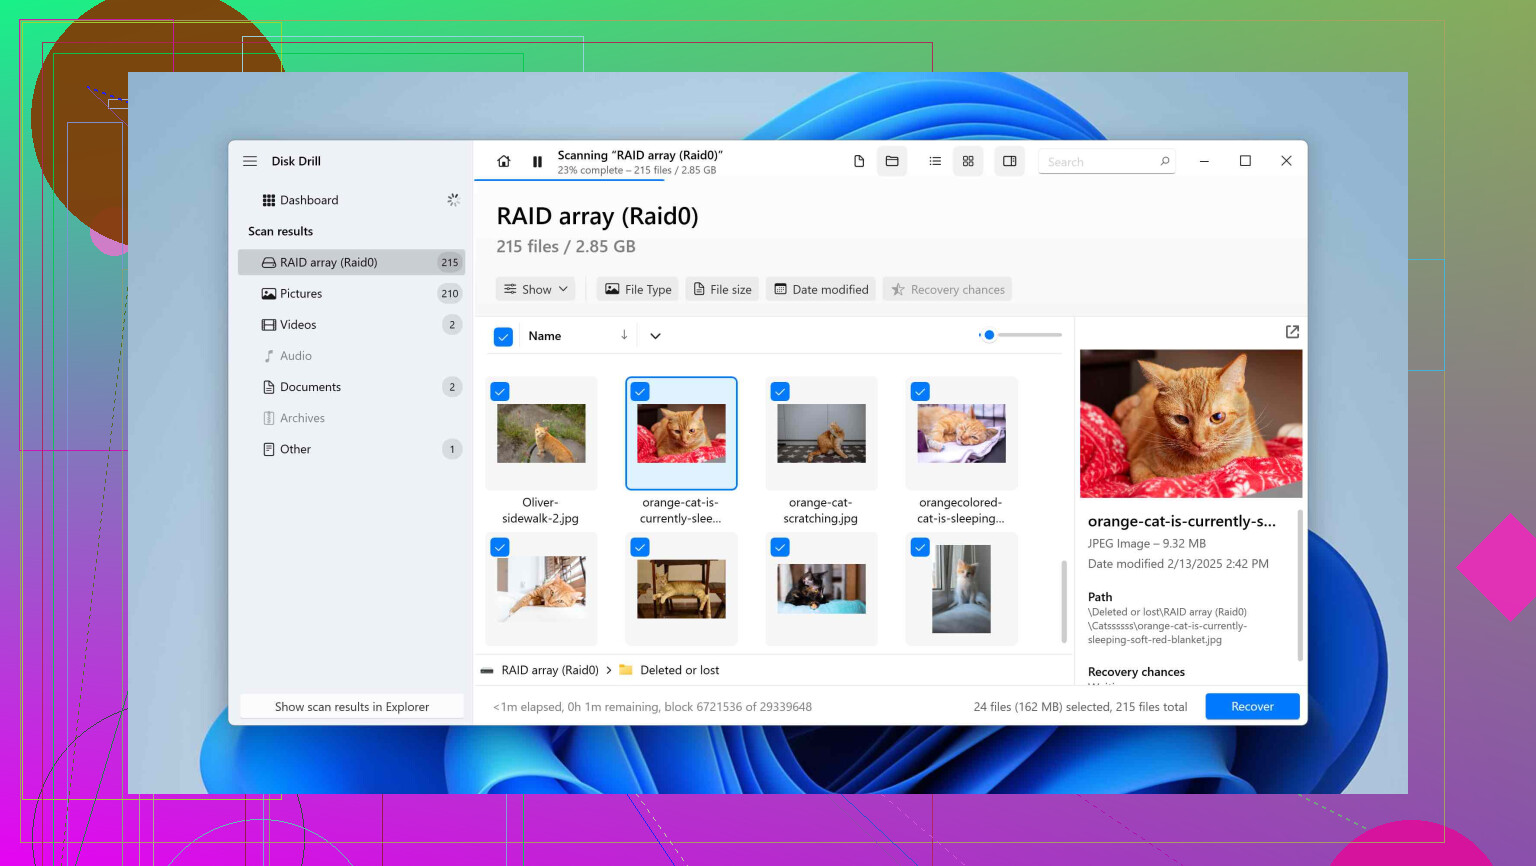
RAID setups, for those who like to live dangerously
I do not run RAID at home, but I tested it a bit on some lab gear and asked questions of folks who do.
Disk Drill understands software RAID layouts such as:
- 0
- 1
- 5
- 6
- 10
- 1E
- JBOD
It also handles Windows Storage Spaces.
What this means in practice:
- if you present the individual member disks to it, it can reconstruct the array virtually
- once reconstructed, you scan that virtual volume instead of individual disks
I am not going to pretend this is a full enterprise-grade RAID lab solution. For home NAS or small office setups that got messed up by a bad rebuild or someone pulling the wrong disk, it is a real option without separate expensive tools.
Where Disk Drill has worked for me, bluntly
Real jobs I have completed using it:
-
Corrupted SD cards from cameras:
- half-transferred photos
- cards yanked mid-record
- file systems gone, cards appearing as RAW
-
Accidentally formatted flash drives:
- one with wedding RAWs
- another with drone footage
-
Failing mechanical hard drives:
- using the byte-to-byte image first
- scanning against the image only
-
A small NAS that lost its mind after a firmware update:
- pulled the drives
- imaged them separately
- reconstructed enough data from the image to save the important folders
Across those:
- success rate was high enough that I kept buying newer versions instead of switching
- the UI never blocked me with weird terminology
- live preview and recovery chance indicators helped avoid hours of manual checking
- camera-focused video recovery was good enough that I started using it as my primary on any card that had video footage
If you are comparing it with other tools
What I usually tell people now:
- Install Disk Drill.
- Point it at the actual drive or card with your missing data.
- Let it run a scan without changing a bunch of advanced settings.
- Preview files in the results.
If it:
- sees the device
- finds your lost files in the tree
- shows clean previews with a high recovery chance
Then buy it and pull the trigger on the restore. If it does not find the data you need, you know before spending money or time copying gigabytes of junk.
For me, that try-before-committing flow made the decision easy. Over time I noticed I stopped opening other recovery apps on my machines, which says enough on its own.
6 Likes
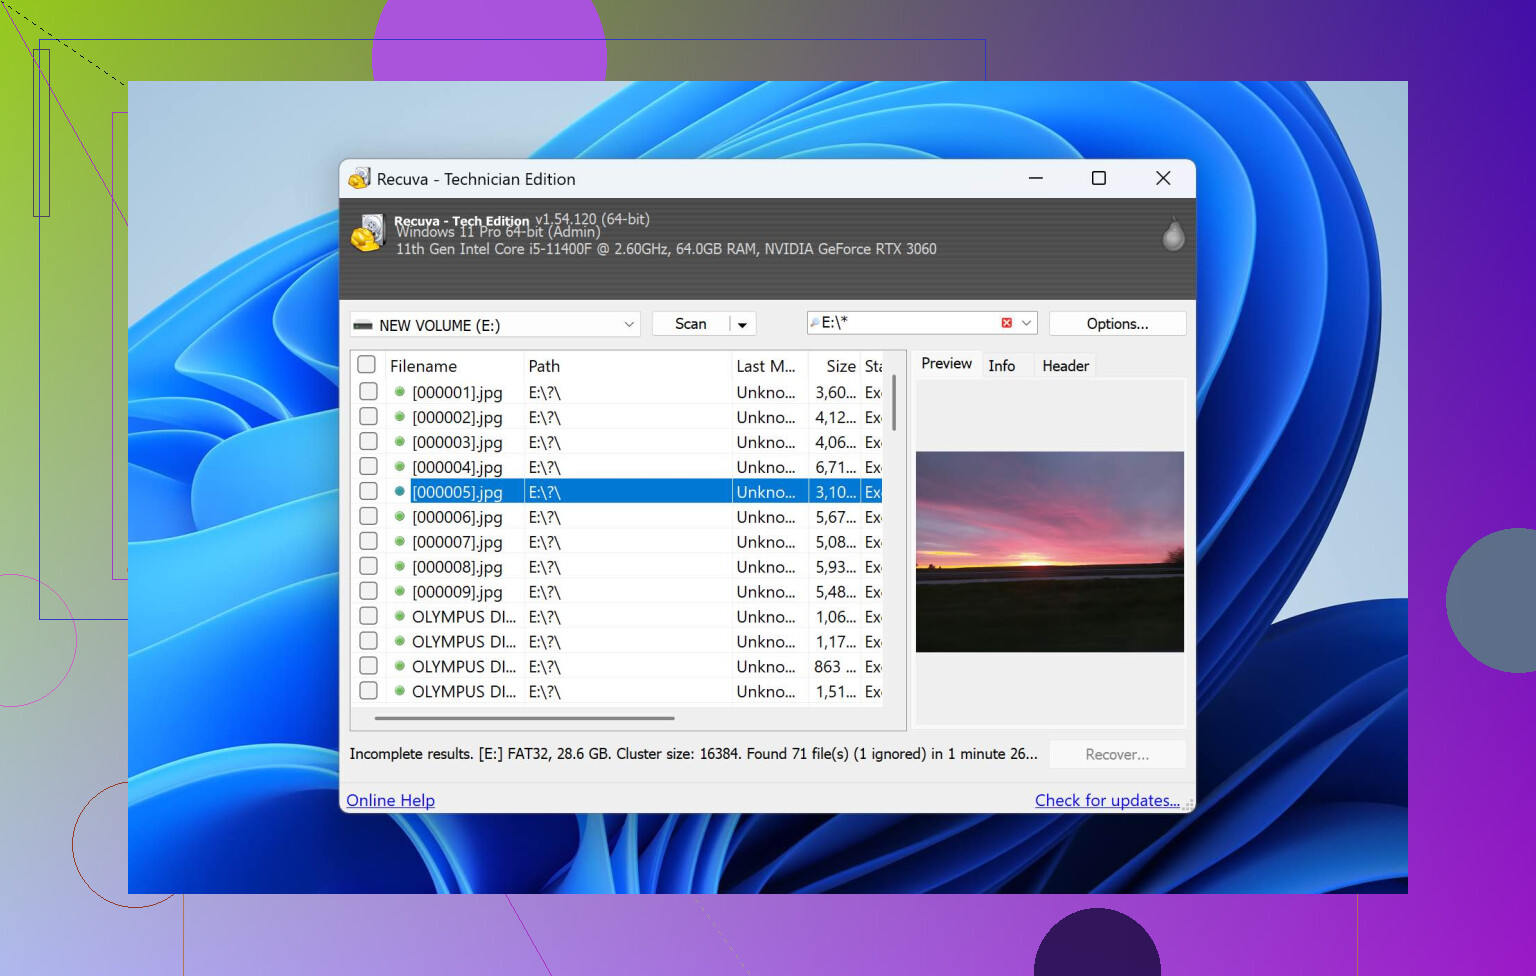
Short version. For your specific “oops deleted, bin emptied” case on Windows:
Recuva works if:
- Files were deleted recently.
- Drive is healthy.
- You want free and simple.
Disk Drill is better if:
- Files are important work plus personal stuff.
- You want previews, recovery chance, and better results on messy situations.
- You are ok paying once you see your files listed.
Where I agree with @mikeappsreviewer: Disk Drill handles mixed photo, video, docs on cards and drives with less fuss. It auto decides scan modes, shows previews, and has that recovery chance indicator. For non‑technical users this saves time and nerves.
Where I slightly disagree: for a plain “deleted from NTFS, no disk issues” job, Recuva is often enough. It is small, free, and you can run a quick scan in minutes. I still use it for throwaway stuff.
Practical steps for you, without repeating all his methods:
-
Stop writing to that drive.
- No downloads.
- No installs to that partition.
- No big file copies.
-
Try Recuva first, since it is free:
- Run normal scan on the drive where the files were.
- If you see your exact filenames and folder paths and green status, restore them to a different physical drive.
- If names are scrambled or many show red, do not waste hours.
-
If Recuva result looks weak or the files are mixed media:
- Install Disk Drill on a different drive than the one you deleted from.
- Run its all‑in‑one scan and use filters:
- Search by file extension you care about (docx, xlsx, pdf, jpg, mp4, etc).
- Sort by “recovery chance” and size.
- Preview important files before you pay.
- If previews look clean, pay and restore to another physical disk.
For “everyday” recovery, Disk Drill gives you more safety features:
- Byte‑to‑byte backup for dodgy disks, so you work on an image, not the dying drive.
- Recovery Vault to log deletions in key folders so future “bin emptied” events hurt less.
- S.M.A.R.T. info to catch failing drives early.
So my recommendation:
- Quick free shot: Recuva.
- If data matters, or if Recuva finds junk or broken files, use Disk Drill and treat it as your main recovery tool long term.
If you want a simple explanation of what data recovery involves, and what to expect in terms of time and success rate, this guide helps a lot: how data recovery works and what you should expect. It covers how deleted files stay on disk until overwritten, why you must stop using the drive, and what software like Disk Drill or Recuva actually do during a scan.
For everyday “oops I nuked it and emptied the bin” recoveries on Windows, here’s the blunt version:
- If the data is nice to have: Recuva.
- If the data actually matters: Disk Drill.
Where I line up with @mikeappsreviewer and @kakeru:
Disk Drill really does a better job once things get even slightly messy. Mixed file types, some older deletions, confusion about which scan mode to pick, or when you’re not 100% sure what happened. It also wins hard if there’s any chance of:
- partial corruption
- SD cards / USB sticks involved
- needing previews to avoid restoring tons of trash
Where I disagree a bit: I don’t treat Recuva as the automatic “first step” anymore. It’s old, hasn’t seen meaningful updates in ages, and on modern large SSDs and HDDs I’ve had it:
- show recoverable files that turned out corrupted
- miss stuff Disk Drill later found on the same drive
It’s still fine as a quick, free try. But for important work + personal files, you’ve already said they’re important, so personally I’d skip the lottery and go straight to Disk Drill.
Given your exact situation:
- Files deleted
- Bin emptied
- Windows PC
- Mix of work and personal stuff
I’d lean Disk Drill for a couple reasons that haven’t been hit too hard yet:
-
Result organization actually matters
Recuva’s results list on bigger scans gets chaotic fast. Tons of random filenames, heaps of “excellent” status files that are actually garbage when opened. Disk Drill’s folder tree, filters, and recovery chance tags make it way easier to:- focus on specific folders (e.g. “Documents”, “Pictures”, a project folder)
- filter by type (pdf, docx, xlsx, jpg, mp4 etc.)
- ignore the low chance junk so you don’t waste time
-
You pay only if it proves it can help
Unlike some tools that lock previews behind the paywall, Disk Drill lets you:- run the full scan
- see your filenames and structure
- preview those key files
Then decide whether to buy.
If it doesn’t show your stuff or the previews are broken, you walk away with only lost time, not lost money.
-
Better safety net for next time
Not what you want to hear right now, but once you’ve been burned once, you know it’ll happen again. Disk Drill’s Recovery Vault and its S.M.A.R.T. monitoring give you:- better undelete odds in the future for specific folders
- earlier warning if your drive is slowly dying before it nukes your work
Personally, I’d do this right now:
- Stop writing anything to that drive/partition. No installs, no downloads, no big saves.
- Install Disk Drill on another drive if possible.
- Let it do its automatic all-in-one scan.
- Use search + filters to locate your main file types and preview the critical ones.
If the previews look good and file paths make sense, bite the bullet and recover to a different physical drive.
If you still want to explore beyond these two tools or just compare options, this breakdown of better choices than Recuva for reliable data recovery is actually useful. It frames where Recuva still makes sense and where something like Disk Drill is the smarter play.
TL;DR: for this specific “important stuff, bin emptied” situation, I’d skip the nostalgia and use Disk Drill as your main recovery tool, keeping Recuva as a fringe free toy rather than your first line of defense.
Short version: for “I really need these files back” on Windows, I’d put Disk Drill ahead of Recuva, but not for the same reasons others have already covered.
A few extra angles that @kakeru, @yozora and @mikeappsreviewer did not hammer on:
1. How tolerant they are of user mistakes
Recuva is ok if you are disciplined: choose the right drive, right mode, immediately recover to a different disk. The problem in real life is that people get panicky and start clicking.
Disk Drill is a bit more idiot proof:
- It defaults to non‑destructive behavior and hides most of the “tweak everything” knobs.
- The interface makes it surprisingly hard to accidentally write back to the same drive you are scanning.
I actually disagree a bit with treating Recuva as “no risk because it is free.” The risk is not the money. The risk is how easy it is to confuse the source/target and quietly stomp on what you are trying to save.
2. Everyday use vs one‑time emergency
If this is a once‑in‑five‑years disaster and you absolutely refuse to pay, then:
- Recuva: worth a quick shot first, provided you keep expectations modest.
If this is going to happen again (work laptop, lots of documents, external drives, SD cards etc.) then Disk Drill starts to make more sense as a permanent tool, not a one‑off:
- It gives you S.M.A.R.T. checks and that Recovery Vault thing.
- You can occasionally check your disks without waiting for a failure.
In other words, Recuva is a band‑aid, Disk Drill is closer to a first‑aid kit you keep in the house.
3. Pros and cons of Disk Drill for your case
Pros
- Very simple workflow: select the partition or disk, hit scan, let its combined scan modes figure things out.
- Strong on mixed data sets: photos, docs, videos, project folders all come back in a usable tree instead of a pile of random filenames.
- Preview is actually reliable. You can check your critical files before committing to buy or recover.
- Good at “messy” scenarios, like older deletions or light corruption, where Recuva often reports “excellent” files that end up broken.
- Cross‑platform license if you ever need to poke at Mac or Linux‑formatted drives from Windows.
Cons
- Not free if you actually want to recover more than a tiny amount. For a one‑time incident, that price can sting.
- Installer and UI are heavier than Recuva. On very old or cramped systems it feels more bloated.
- If you are a power user who likes detailed control of scanning modes, Disk Drill can feel a bit opaque compared to old‑school tools.
- Recovery Vault only helps after you have installed and enabled it, so it does not magically boost success on the incident you already had.
4. What I would actually do in your shoes
Since you said “important work and personal files” and the Recycle Bin is emptied:
- Stop using that drive for anything except running a scanner.
- Install Disk Drill to a different physical drive if you can.
- Run a full scan on the affected partition.
- Use search + file‑type filters to locate your key work folders and personal stuff, then preview a handful from each.
- If previews look clean, pay once and recover to an external drive or another internal disk.
Only if Disk Drill fails to show what you need would I fall back to Recuva or other tools. Trying Recuva first just to “save money” can cost you time and increase the chance you overwrite something by mistake.
So the way I see it, given your description, Disk Drill is the better everyday safety net and the safer bet for this particular loss, while Recuva remains a lightweight “free try” tool that I would only rely on when the data is not business‑critical.